AI chat applications are everywhere now. From ChatGPT to coding assistants and support bots, conversational AI has become one of the most exciting areas for developers. But here’s the good part you do not need a massive ML setup or a paid API to build your own AI chat application. In this tutorial, you will learn how to build your own ChatGPT clone in just 30 minutes using Python, Flask, HTML, CSS, JavaScript, and Ollama. By the end of this guide, you will have a working AI chat app with
- A clean chat interface
- Conversation-style message bubbles
- Local AI model integration
- A real backend API
- A ChatGPT-style experience running on your own machine
This is a beginner-friendly project and a great starting point if you want to build your own AI products.
- Prerequisite
- Architecture
- Project Structure
- Create the virtual Environment
- Install Python Dependencies
- Ollama Server Details
- Create the Flask Backend
- Create the Frontend UI
- Add Styling for the UI
- Run your app and send message
- Streaming Response in ChatGPT Clone
- Markdown Support and Syntax Highlighting in ChatGPT Clone
- Next Improvements
- FAQ
- References
Prerequisite
- Python Virtual Environment
- Ollama Installation
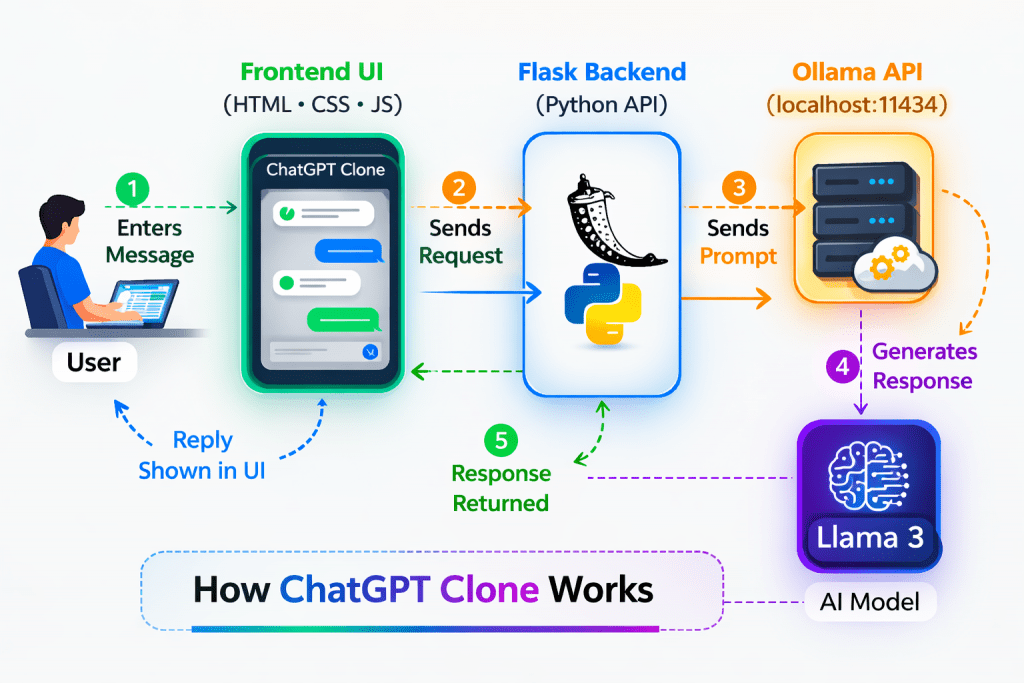
Architecture
Project Structure
chatgpt-clone/
│
├── app.py
├── requirements.txt
├── static/
│   └── style.css
└── templates/
└── index.htmlThis structure keeps the project clean and easy to understand.
Create the virtual Environment
Goto to the folder where you want to create the project
mkdir chatgpt-clone
cd chatgpt-cloneNow create and activate the virtual environment
virtualenv -p /usr/bin/python3 venv
souve venv/bin/activateInstall Python Dependencies
Create a file named requirements.txt and add
flask
requestsNow install the dependencies
pip install -r requirements.txtOllama Server Details
If you follow the prerequisite then you will have a local version of Llama3:8b model running on your local machine. The host you will be using will be
http://localhost:11434If you are running Ollama on different server then use the IP address of that server
11434 is the default port for Ollama server
Create the Flask Backend
Create a file named app.py which will be your main file for backend related code
from flask import Flask, render_template, request, jsonify
import requests

app = Flask(__name__)

OLLAMA_API_URL = "http://192.168.0.114:11434/api/generate"

@app.route("/")
def home():
    return render_template("index.html")

@app.route("/chat", methods=["POST"])
def chat():
    user_message = request.json.get("message", "").strip()

    if not user_message:
        return jsonify({"reply": "Please enter a message."}), 400

    payload = {
        "model": "llama3:8b",
        "prompt": user_message,
        "stream": False
    }

    try:
        response = requests.post(OLLAMA_API_URL, json=payload)
        response.raise_for_status()
        ai_reply = response.json().get("response", "No response from model.")
        return jsonify({"reply": ai_reply})
    except requests.exceptions.RequestException as e:
        return jsonify({"reply": f"Error connecting to Ollama: {str(e)}"}), 500

if __name__ == "__main__":
app.run(debug=True)This backend does some main things
- Serves the chat page using the root route
- http://localhost:5000
- Receives messages from the frontend
- http://localhost:5000/chat
- Sends the user prompt to Ollama and returns the AI response
- Connects to the local Ollama server using the OLLAMA_API_URL config
This is the core connection between your web app and the AI model.
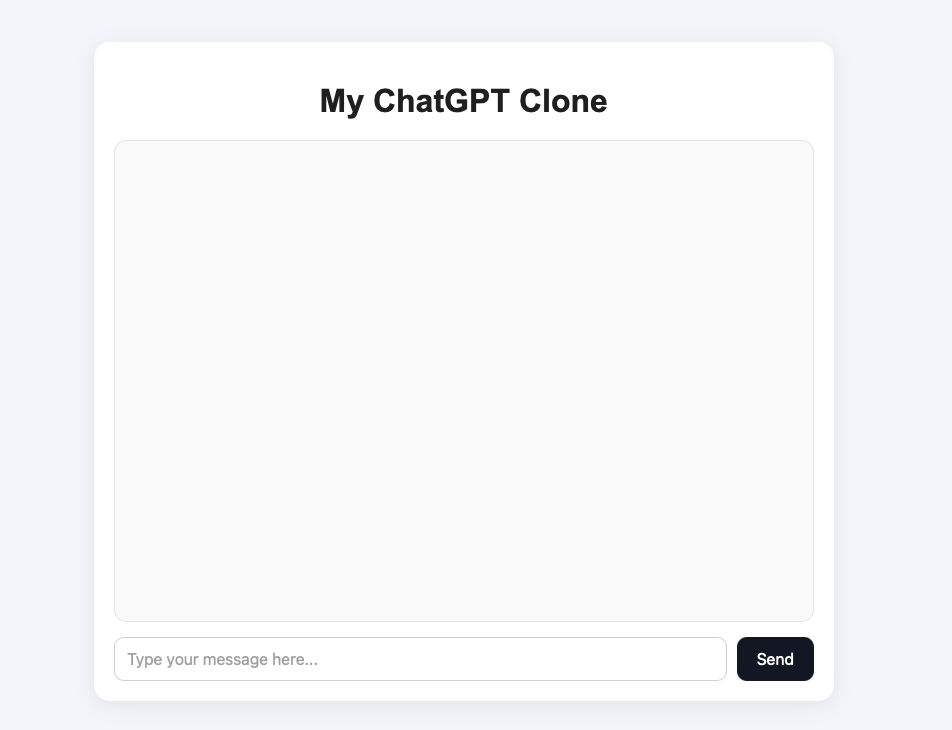
Create the Frontend UI
Create a file named templates/index.html
mkdir templates
cd templates
touch index.htmlPut the below contents in the file
<!DOCTYPE html>
<html lang="en">
<head>
    <meta charset="UTF-8">
    <meta name="viewport" content="width=device-width, initial-scale=1.0">
    <title>ChatGPT Clone</title>
    <link rel="stylesheet" href="{{ url_for('static', filename='style.css') }}">
</head>
<body>
    <div class="chat-container">
        <h1>My ChatGPT Clone</h1>
        <div id="chat-box" class="chat-box"></div>

        <div class="input-area">
            <input type="text" id="user-input" placeholder="Type your message here..." />
            <button onclick="sendMessage()">Send</button>
        </div>
    </div>

    <script>
        async function sendMessage() {
            const input = document.getElementById("user-input");
            const chatBox = document.getElementById("chat-box");
            const message = input.value.trim();

            if (!message) return;

            chatBox.innerHTML += `<div class="message user-message"><strong>You:</strong> ${message}</div>`;
            input.value = "";

            chatBox.innerHTML += `<div class="message bot-message"><strong>AI:</strong> Thinking...</div>`;
            chatBox.scrollTop = chatBox.scrollHeight;

            const botPlaceholders = document.querySelectorAll(".bot-message");
            const currentBotMessage = botPlaceholders[botPlaceholders.length - 1];

            try {
                const response = await fetch("/chat", {
                    method: "POST",
                    headers: {
                        "Content-Type": "application/json"
                    },
                    body: JSON.stringify({ message: message })
                });

                const data = await response.json();
                currentBotMessage.innerHTML = `<strong>AI:</strong> ${data.reply}`;
            } catch (error) {
                currentBotMessage.innerHTML = `<strong>AI:</strong> Something went wrong.`;
            }

            chatBox.scrollTop = chatBox.scrollHeight;
        }
    </script>
</body>
</html>The Fronted does these main things
- Create a input box where user can type the message and then hit the send button
- Message is sent to the backend server and when response comes then it is shown on th screen
Add Styling for the UI
Let’s create a new file static/style.css where we will put our styles
mkdir static
cd static
touch style.cssPut below contents in the style.css
body {
    font-family: Arial, sans-serif;
    background: #f4f7fb;
    margin: 0;
    padding: 0;
}

.chat-container {
    width: 90%;
    max-width: 700px;
    margin: 40px auto;
    background: #ffffff;
    border-radius: 16px;
    box-shadow: 0 4px 20px rgba(0, 0, 0, 0.08);
    padding: 20px;
}

h1 {
    text-align: center;
    margin-bottom: 20px;
    color: #222;
}

.chat-box {
    height: 450px;
    overflow-y: auto;
    border: 1px solid #e5e7eb;
    border-radius: 12px;
    padding: 15px;
    background: #fafafa;
    margin-bottom: 15px;
}

.message {
    padding: 12px 14px;
    margin-bottom: 12px;
    border-radius: 12px;
    line-height: 1.5;
    max-width: 85%;
}

.user-message {
    background: #dbeafe;
    margin-left: auto;
    text-align: right;
}

.bot-message {
    background: #e5e7eb;
    margin-right: auto;
    text-align: left;
}

.input-area {
    display: flex;
    gap: 10px;
}

.input-area input {
    flex: 1;
    padding: 12px;
    border: 1px solid #d1d5db;
    border-radius: 10px;
    font-size: 16px;
}

.input-area button {
    padding: 12px 20px;
    border: none;
    background: #111827;
    color: white;
    border-radius: 10px;
    cursor: pointer;
    font-size: 16px;
}

.input-area button:hover {
    opacity: 0.9;
}Run your app and send message
Start the chatgpt clone server in the debug mode
python app.py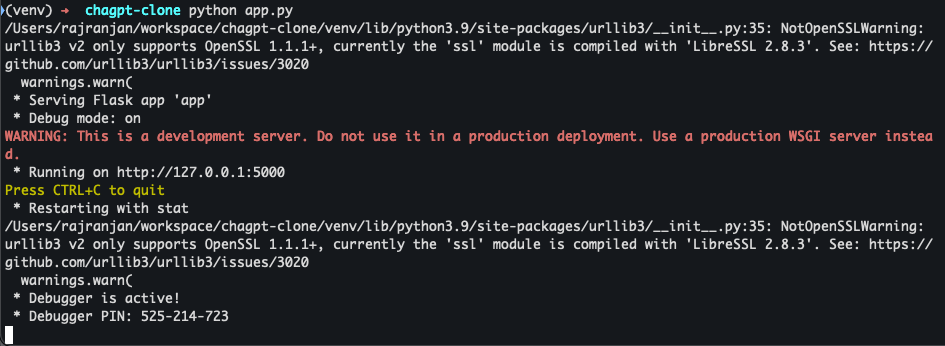
Let’s try asking a message that **Explain recursion to me**
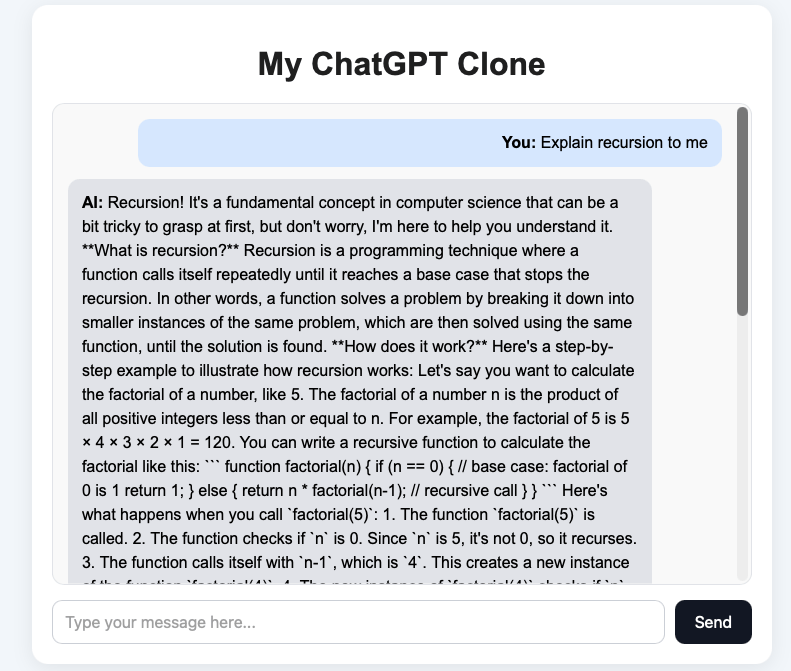
You can see that the we got a message from the Local AI server and everything looks fine.
But there are three important limitations
- Code highlighting
- Markdown rendering
- Streaming Response
Streaming Response in ChatGPT Clone
Streaming responses is the right upgrade. It makes your ChatGPT clone feel way more real and gives user a better experience
What we are going to add are the below improvements
- Backend calls Ollama with
"stream": true - Flask streams chunks back to the browser
- Frontend reads the stream and updates the assistant message live
we will update the /chat API such that it can support streaming response
from flask import Flask, render_template, request, Response, stream_with_context
import requests
import json

app = Flask(__name__)

OLLAMA_API_URL = "http://192.168.0.114:11434/api/generate"


@app.route("/")
def home():
    return render_template("index.html")


@app.route("/chat", methods=["POST"])
def chat():
    data = request.get_json()
    user_message = data.get("message", "").strip()

    if not user_message:
        return Response("Please enter a message.", status=400, mimetype="text/plain")

    payload = {
        "model": "llama3:8b",
        "prompt": user_message,
        "stream": True
    }

    def generate():
        try:
            with requests.post(OLLAMA_API_URL, json=payload, stream=True, timeout=120) as response:
                response.raise_for_status()

                for line in response.iter_lines():
                    if not line:
                        continue

                    try:
                        chunk = json.loads(line.decode("utf-8"))
                        token = chunk.get("response", "")
                        if token:
                            yield token

                        if chunk.get("done", False):
                            break
                    except json.JSONDecodeError:
                        continue

        except requests.exceptions.RequestException as e:
            yield f"\n[Error connecting to Ollama: {str(e)}]"

    return Response(
        stream_with_context(generate()),
        mimetype="text/plain"
    )


if __name__ == "__main__":
app.run(debug=True, threaded=True)The important changes that we did for streaming response are
- Enabled streaming from Ollama by setting
"stream": Truein the payload, so the model sends the response in chunks instead of one final response. - Added a generator function (
generate()) to read the streamed response line by line and forward each token immediately. - Used Flask’s streaming Response with
stream_with_context(generate())so the backend can send data to the frontend continuously in real time. - Handled completion and errors properly by checking the
doneflag from Ollama and catching request exceptions if the Ollama server is unavailable.
We will update the index.html file to handle the streaming message. Update the sendMessage method
<script>
    async function sendMessage() {
        const input = document.getElementById("user-input");
        const chatBox = document.getElementById("chat-box");
        const message = input.value.trim();

        if (!message) return;

        chatBox.innerHTML += `<div class="message user-message"><strong>You:</strong> ${escapeHtml(message)}</div>`;
        input.value = "";

        const botMessage = document.createElement("div");
        botMessage.className = "message bot-message";
        botMessage.innerHTML = `<strong>AI:</strong> <span class="bot-text">Thinking...</span>`;
        chatBox.appendChild(botMessage);
        chatBox.scrollTop = chatBox.scrollHeight;

        const botText = botMessage.querySelector(".bot-text");
        botText.textContent = "";

        try {
            const response = await fetch("/chat", {
                method: "POST",
                headers: {
                    "Content-Type": "application/json"
                },
                body: JSON.stringify({ message })
            });

            if (!response.ok) {
                botText.textContent = "Something went wrong.";
                return;
            }

            const reader = response.body.getReader();
            const decoder = new TextDecoder();

            while (true) {
                const { value, done } = await reader.read();

                if (done) break;

                const chunk = decoder.decode(value, { stream: true });
                botText.textContent += chunk;
                chatBox.scrollTop = chatBox.scrollHeight;
            }
        } catch (error) {
            botText.textContent = "Something went wrong while streaming the response.";
        }
    }

    function escapeHtml(text) {
        const div = document.createElement("div");
        div.textContent = text;
        return div.innerHTML;
    }
</script>The Important changes that we did in the frontend are
- Replaced the normal wait-for-full-response logic with stream reading using
response.body.getReader(), so the browser can receive the AI reply chunk by chunk. - Created the assistant message box immediately with a temporary “Thinking…” state, then kept updating that same message as new text arrived.
- Used
TextDecoder()to decode streamed chunks from the backend and append them live to the bot message, which creates the typing effect. - Kept the chat UX smooth by auto-scrolling as each new chunk arrived, so the latest streamed response always stays visible.
Markdown Support and Syntax Highlighting in ChatGPT Clone
Right now your frontend probably does something like stream plain text and append text into textContent. The next big upgrade is the markdown support and syntax highlighting. we will read the response and try to add
- Headings
- Bullet points
- Bold text
- code blocks
will look much more like a real ChatGPT app.
To support markdown properly, we should:
- Keep collecting the streamed response in a variable
- Parse that full/partial text as markdown
- Render it into the bot message HTML
- Optionally highlight code blocks
we will be using the two frontend libraries **marked** and **highlight.js**
Step 1: Add CDN links in index.html
Inside your <head> add the below lines
<script src="https://cdn.jsdelivr.net/npm/marked/marked.min.js"></script>
<link rel="stylesheet" href="https://cdn.jsdelivr.net/npm/highlight.js/styles/github-dark.min.css">
<script src="https://cdn.jsdelivr.net/npm/highlight.js/lib/highlight.min.js"></script>Step 2: Update your bot message rendering logic
we will update the sendMessage method with below rendering logic
<script>
    async function sendMessage() {
        const input = document.getElementById("user-input");
        const chatBox = document.getElementById("chat-box");
        const message = input.value.trim();

        if (!message) return;

        chatBox.innerHTML += `
            <div class="message user-message">
                <strong>You:</strong>
                <div>${escapeHtml(message)}</div>
            </div>
        `;

        input.value = "";

        const botMessage = document.createElement("div");
        botMessage.className = "message bot-message";
        botMessage.innerHTML = `
            <strong>AI:</strong>
            <div class="bot-text">Thinking...</div>
        `;
        chatBox.appendChild(botMessage);
        chatBox.scrollTop = chatBox.scrollHeight;

        const botText = botMessage.querySelector(".bot-text");
        let fullResponse = "";
        let hasStreamedContent = false;

        try {
            const response = await fetch("/chat", {
                method: "POST",
                headers: {
                    "Content-Type": "application/json"
                },
                body: JSON.stringify({ message })
            });

            if (!response.ok) {
                botText.textContent = "Something went wrong.";
                return;
            }

            const reader = response.body.getReader();
            const decoder = new TextDecoder();

            botText.innerHTML = "";

            while (true) {
                const { value, done } = await reader.read();
                if (done) break;

                const chunk = decoder.decode(value, { stream: true });
                if (!chunk) continue;

                fullResponse += chunk;
                hasStreamedContent = true;

                try {
                    botText.innerHTML = marked.parse(fullResponse);
                } catch (renderError) {
                    console.error("Intermediate markdown render error:", renderError);
                }

                chatBox.scrollTop = chatBox.scrollHeight;
            }

            const remaining = decoder.decode();
            if (remaining) {
                fullResponse += remaining;
            }

            botText.innerHTML = marked.parse(fullResponse);

            botText.querySelectorAll("pre code").forEach((block) => {
                hljs.highlightElement(block);
            });

            chatBox.scrollTop = chatBox.scrollHeight;

        } catch (error) {
            console.error("Streaming error:", error);

            if (!hasStreamedContent) {
                botText.textContent = "Something went wrong while streaming the response.";
            }
        }
    }

    function escapeHtml(text) {
        const div = document.createElement("div");
        div.textContent = text;
        return div.innerHTML;
    }
</script>Step 3: Improve CSS for markdown content
we will also need to improve our UI to make our ChatGPT clone look more professional. In your style.css add the below lines
.bot-text {
    line-height: 1.6;
    word-wrap: break-word;
}

.bot-text p {
    margin: 0 0 12px;
}

.bot-text ul,
.bot-text ol {
    padding-left: 20px;
    margin: 10px 0;
}

.bot-text li {
    margin-bottom: 6px;
}

.bot-text pre {
    background: #111827;
    color: #f9fafb;
    padding: 12px;
    border-radius: 10px;
    overflow-x: auto;
    margin: 12px 0;
}

.bot-text code {
    font-family: Consolas, Monaco, monospace;
    font-size: 14px;
}

.bot-text p code,
.bot-text li code {
    background: #f3f4f6;
    color: #111827;
    padding: 2px 6px;
    border-radius: 6px;
}

.bot-text h1,
.bot-text h2,
.bot-text h3 {
    margin: 16px 0 10px;
    color: #111827;
}

.bot-text blockquote {
    border-left: 4px solid #d1d5db;
    margin: 12px 0;
    padding-left: 12px;
    color: #4b5563;
}You will see the final rendering something like this

Next Improvements
This ChatGPT clone is a great starting point, but there are several ways you can take it to the next level and make it feel more like a production ready AI application.
Add Conversation Memory
Right now, the chatbot responds only to the current message. A useful next step is to add conversation memory so the assistant can remember previous messages and answer in context.
Support Multiple Chat Sessions
A real ChatGPT-style application usually allows users to create multiple conversations. You can improve this project by adding separate chat sessions and switching between them.
FAQ
What is a ChatGPT clone?
A ChatGPT clone is an application that mimics the basic functionality of ChatGPT. It usually includes a chat interface, a backend API, and an AI model that generates responses based on user input.
Can I build a ChatGPT clone without using the OpenAI API?
Yes. In this project, we use Ollama and a local LLM such as Llama 3, so you do not need the OpenAI API to build and run the chatbot.
Is this ChatGPT clone running locally?
Yes. The chatbot runs locally on your machine. The frontend, Flask backend, and Ollama model all work on your local system.
Why did we use Flask for this project?
Flask is lightweight, beginner friendly, and easy to set up. It is a good choice for learning how a basic AI web app works.