- Prerequisite
- Database Schema Design for User Management Service
- Create a Database in MySQL
- Create the Users table in the User Management service database
- Java MySQL Library
- Connect to MySQL Database
- User Model for User Management System
- User Repository for the user table interaction
- References
In our user management service, we are going to store the user details and then use those user details for displaying and login purposes. we will be using MySQL relational database for this project. In this post, we will learn to design the Database schema and then write code to establish the database connection from our Java application with the MySQL database.
- Part 1: What we are going to Build | User Management Service | Java | GRPC
- Part 2: MySQL Database | User Management Service | Java GRPC
- Part 3: GRPC Server Java | User Management Service
- Part 4: Create User in User Management Service GRPC Java
- Part 5: JWT token Java | User Management Service Java GRPC
- Part 6: Login API with JWT | User Management service Java GRPC
Prerequisite
- MySQL must be installed on your operating system. You should know the credentials of your MySQL database for connection. If you want to install MySQL then follow the below post.
Database Schema Design for User Management Service
As we are creating a user management service we will mostly stick around the properties related to a user. The properties that we will be capturing are
Constraints on MySQL database fields
Before defining the actual fields of the user, let’s understand some of the constraints or features that MySQL provides which you can use on the database fields
- AUTO_INCREMENT
- This value inside this field will be automatically put by the MySQL database if the user has not provided it
- The value will be one more than the previous value present in the database.
- This will automatically make the key unique
- NOT NULL
- This is used to signify that the value is mandatory and should be provided by the user.
- The database will return an error if a field is marked NOT NULL and no value is provided by the user.
- VARCHAR
- This is the data type that you want your field to have. VARCHAR stands for variable character and you can define the range between 1 to 255 eg. VARCHAR(30), VARCHAR(150)
- UNIQUE
- There will not be any duplicate value if the column is assigned a UNIQUE value.
- Also, the column automatically becomes indexed if the field is assigned UNIQUE property
- DEFAULT <default-value>
- If the user has not provided any value then the database will automatically assign the given <default-value> to the column
- example, created_at DEFAULT current_timestamp()
- If the user has not provided any value to the created_at column then the database will assign the current time of the database server.
- PRIMARY KEY
- Automatically provides uniqueness to the column
- Indexing is automatically available for the column
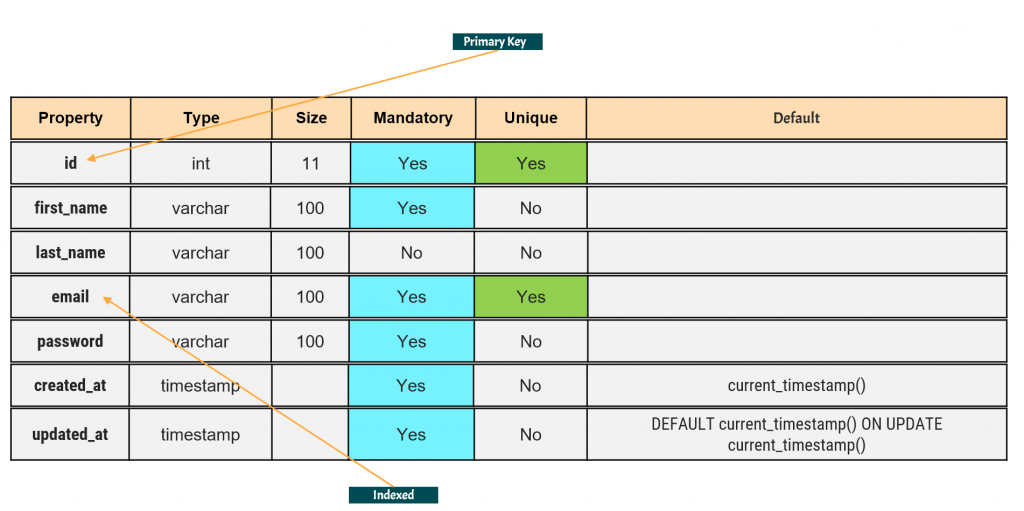
Properties of a User
- id: Unique ID for every user in the System.
- first_name: First name of the user.
- last_name: Last name of the user.
- email: Email of the user.
- password: Password of the users.
- created_at: Time when the user is created.
- updated_at: Time when the user is updated.
Let’s represent the final representation of our table schema in tabular format
Create a Database in MySQL
I always prefer the CLI tool when interacting with the database as it helps me to learn the commands and also during production issues, you will not have any graphical user interface to run the MySQL commands
Connect to database
Login to your MySQL instance. This will ask you to enter the password
mysql -h <ip-address> -u<user-name> -p 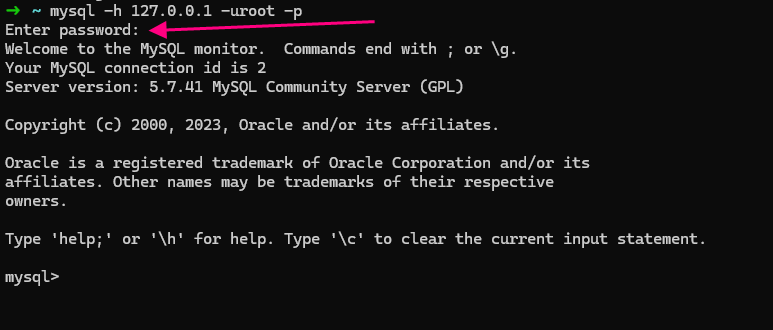
Create Database
Now create the database using the below command
create database user_management_system;Check Database
Now check if the database is created or not
show databases;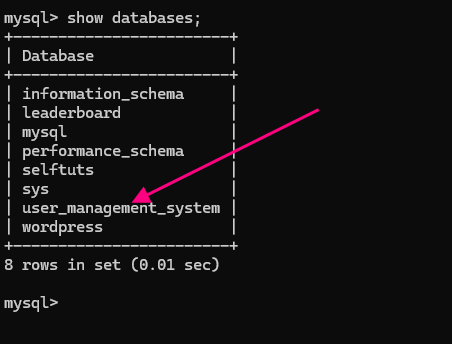
Create the Users table in the User Management service database
MySQL provides the create table command for creating a new table in the database. Before creating the table you need to select the database where you want to create the table.
Select database
use user_management_systemCreate table in database
Now run the below command to create the user table with all the properties
CREATE TABLE `users` (
  `id` int(11) NOT NULL AUTO_INCREMENT,
  `first_name` varchar(100) NOT NULL,
  `last_name` varchar(100) NOT NULL,
  `email` varchar(100) NOT NULL,
  `password` varchar(100) NOT NULL,
  `created_at` timestamp NOT NULL DEFAULT current_timestamp(),
  `updated_at` timestamp NOT NULL DEFAULT current_timestamp() ON UPDATE current_timestamp(),
  PRIMARY KEY (`id`),
  CONSTRAINT `unique_email` UNIQUE (`email`)
);
List all tables
Check if the table is created or not
show tables;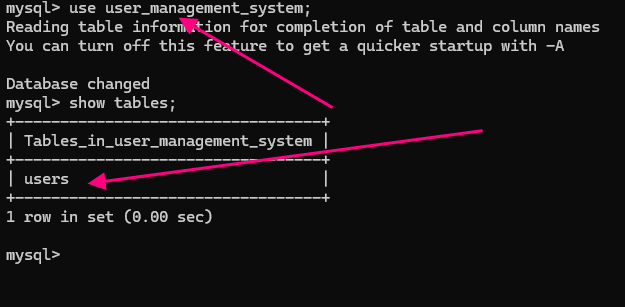
View table details
Let’s see the details of the table
describe users;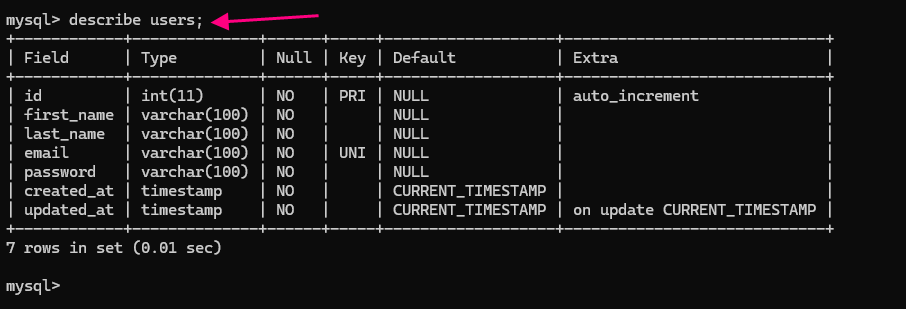
Java MySQL Library
we need to use a library that will help us to connect to the MySQL database and then run the commands on the database. we will be using the mysql-connector-j library for this purpose
Add the mysql-connector-j library as a dependency to your build.gradle file. You can upgrade the library version if you want.
implementation group: 'com.mysql', name: 'mysql-connector-j', version: '8.3.0'Java provides us with the DriverManager to make connections with any database using a suitable driver.
Connect to MySQL Database
Let’s create a new file Database.java which will handle the below responsibilities
- It will use the Java Driver Manager to connect to the MySQL database
- If anywhere in the application there is a need to open a connection to the MySQL database then this Class will be used
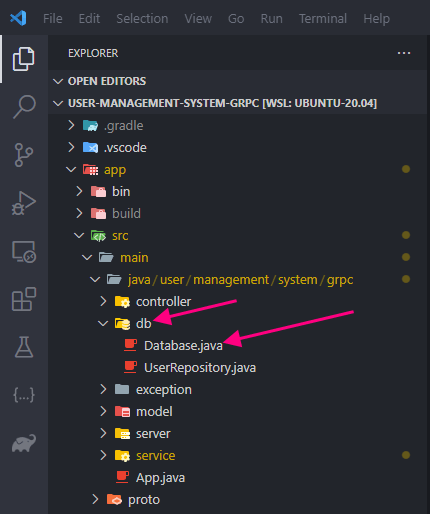
Create a new folder db and then create a new Class file Database.java and put the below contents
package user.management.system.grpc.db;
import java.sql.DriverManager;
import java.sql.SQLException;
import java.sql.Connection;

public class Database {
    private String connectionURL = "jdbc:mysql://localhost:3306/user_management_system?useSSL=false";

    public Connection getConnection() {

        try {
            Connection connection = DriverManager.getConnection(connectionURL, "root", "password");
            return connection;

        } catch (SQLException e) {
            e.printStackTrace();
            return null;
        }

    }
}
- Variables
- connectionURL
- This is the connection URL for the MySQL database which contains important information
- MySQL driver is being used
- IP address or hostname of the MySQL server
- Port of the MySQL server. The default port is 3306
- The database name is user_management_system
- we are not using SSL-based authentication with the MySQL server
- connectionURL
- Public Methods
- getConnection
- uses the Java DriverManger to connect to the database
- returns the connection object
- If there is SQLException during connection creation then it returns a null object which the client can use to make decisions and return proper errors.
- Also, we are printing stack traces for debugging purposes
- getConnection
User Model for User Management System
We need to create a User model so that we can pass the user data between different classes and also get or set information about the user when returning the GRPC response or mapping the database record to a User Model
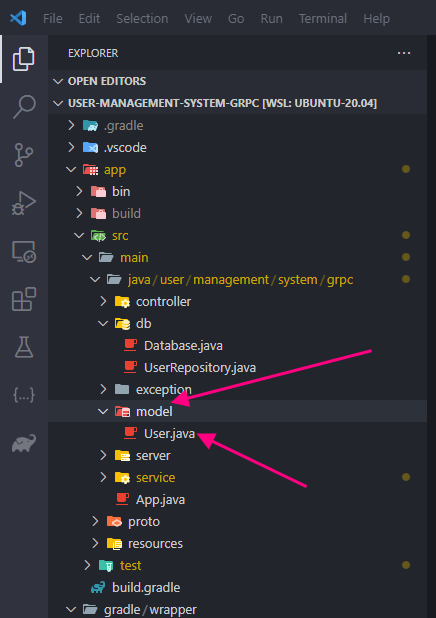
Create a folder model and then create the class User.java
Populate the User.java with user model data
package user.management.system.grpc.model;

public class User {

    private int id;
    private String firstName;
    private String lastName;
    private String email;
    private String password;
    private String createdAt;
    private String updatedAt;

    public int getId() {
        return id;
    }
    public String getFirstName() {
        return firstName;
    }
    public String getLastName() {
        return lastName;
    }
    public String getEmail() {
        return email;
    }
    public String getPassword() {
        return password;
    }
    public String getCreatedAt() {
        return createdAt;
    }
    public String getUpdatedAt() {
        return updatedAt;
    }
    public void setId(int id) {
        this.id = id;
    }
    public void setFirstName(String firstName) {
        this.firstName = firstName;
    }
    public void setLastName(String lastName) {
        this.lastName = lastName;
    }
    public void setEmail(String email) {
        this.email = email;
    }
    public void setPassword(String password) {
        this.password = password;
    }
    public void setCreatedAt(String createdAt) {
        this.createdAt = createdAt;
    }
    public void setUpdatedAt(String updatedAt) {
        this.updatedAt = updatedAt;
    }

    public String toString() {
        return id + " " + firstName + " " + lastName + " " + email + " " + password + " " + createdAt + " " + updatedAt;
    }

}
- Variables
- we have added all the properties to the User model which we discussed during Database schema modeling.
- All these properties are private and can be accessed only using setter and getter
- Public Methods
- Setter Methods is exposed for all the property
- Getter Methods is exposed for all the property
- toString
- This is just for debugging purposes to print the values of all the properties of the User model
User Repository for the user table interaction
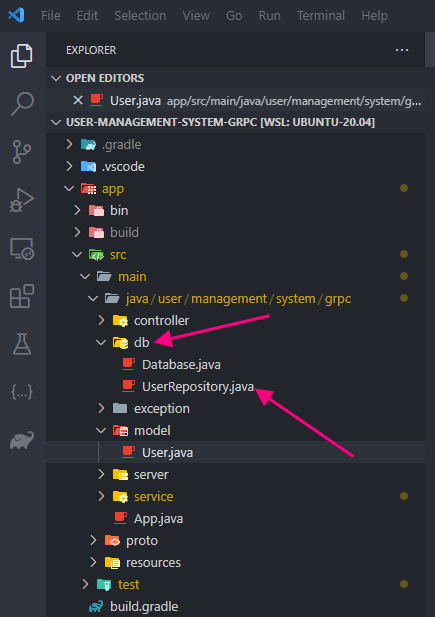
we need a UserRepository class that will interact with the user table for performing modifications to the user table and also for fetching user information from the table. Create a UserRepository class inside the db folder
package user.management.system.grpc.db;

import java.sql.Connection;
import java.sql.ResultSet;
import java.sql.SQLException;
import java.sql.Statement;

import user.management.system.grpc.model.User;

public class UserRepository {
    Database db;

    public UserRepository(Database db){
        this.db = db;
    }
    public void CreateUser(User user) throws SQLException{
        String sqlString = "INSERT INTO users (first_name, last_name, email, password) "+
        " VALUES ('"+ user.getFirstName() +"', '"+ user.getLastName() +"', '"+ user.getEmail() +"', '"+ user.getPassword() +"')";
        Connection connection = db.getConnection();
        connection.createStatement().execute(sqlString);
    }

    public User findUserByEmail(String email) throws SQLException {
        System.out.println(email);
        String sqlString = "SELECT * FROM users WHERE email = '" + email  +"'";
            Connection connection = db.getConnection();
            Statement statement = connection.createStatement();
            ResultSet executeQuery = statement.executeQuery(sqlString);

            if(executeQuery.next()) {
                User user = new User();
                user.setId(executeQuery.getInt("id"));
                user.setFirstName(executeQuery.getString("first_name"));
                user.setLastName(executeQuery.getString("last_name"));
                user.setEmail(executeQuery.getString("email"));
                user.setPassword(executeQuery.getString("password"));
                return user;
            }
            return null;
    }

    public User findByEmailAndPassword(String email, String password) throws SQLException {
        String sqlString = "SELECT * FROM users WHERE email = '" + email  +"' AND password = '" + password +"'";
            Connection connection = db.getConnection();
            Statement statement = connection.createStatement();
            ResultSet executeQuery = statement.executeQuery(sqlString);
            if(executeQuery.next()) {
                User user = new User();
                user.setId(executeQuery.getInt("id"));
                user.setFirstName(executeQuery.getString("first_name"));
                user.setLastName(executeQuery.getString("last_name"));
                user.setEmail(executeQuery.getString("email"));
                user.setPassword(executeQuery.getString("password"));
                return user;
            }
            return null;
    }
}
- Variables
- db
- This is for storing the database connection object
- The constructor accepts the database connection instance
- db
- Public Methods
- UserRepository
- This is constructor
- Accept the database instance in the constructor
- We take the database instance in the constructor because we don’t want to make the database connection for each call as this will increase the load on the database and the application will crash
- CreateUser
- Accept the User Model and then insert the user into the MySQL database
- findUserByEmail
- Accept the email and then find the record based on the email address
- As the email field is already indexed so search will be fast
- we return a null value if no user is found by email.
- findByEmailAndPassword
- Accept the email and the password
- Find user based on email and password combination
- we return a null value if no user is found using the email and password combination
- UserRepository
- Exception Handling
- You can see that each method is throwing exception but we are not catching it here. It will be the responsibility of the client to handle these exceptions and return meaningful error responses to the user.
Until now we have completed
- Java Project setup
- Database schema design and Database connection
Previous: Part 1: What we are going to Build | User Management Service | Java | GRPC
Next: Protobuf Contract for User Management Service